
‘Tis the season of exchanging gifts, so I thought I would give you a present. I have done several iterations of my Snowy Owl, one of which is a tiny version I give away. Here is the printable pdf and instructions so that you can make your own copy. (You can make some for your family/friends if you wish, but please do not sell copies of this book.)
 First download and print the pdf. The image is sized for 8.5 x 11 inch paper, but should print on A4. If you are missing the guide marks for some of the score/cut lines, downsize the image slightly. I used 67# cover stock and a laser printer for this copy, but you can use any paper 24# or heavier, and whatever printer you have. I do not recommend card stock for this project.

There are guide marks on the page. I have indicated in the picture which lines should be scored and some of the cutting lines. Do the scoring first!

There will be an extra bit of paper at each end of the sections. After cutting that off you should end up with three sections like the ones shown above.
The next step is folding. The first page of the first section is the front cover so it should be folded away from you, with the next two pages forming the first page spread of the accordion. After all the folding is done, your sections should look like this:
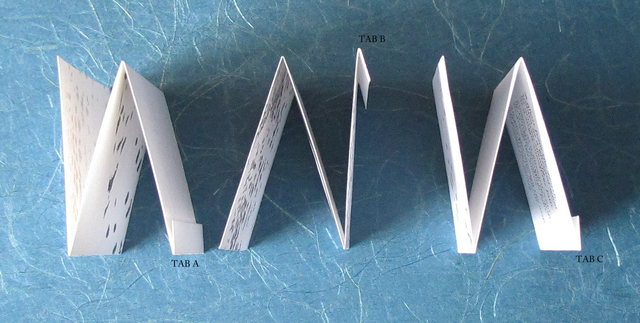
Glue the cover page to the first page of the accordion. Glue the outside of Tab A to the back of the first page of the second section. Glue the inside of Tab B to the back of the first page of the third section. Because that page will have to fit inside a fold you will need to trim a tiny slice off so that your folds still line up when the book is closed.
I like to put some kind of closure on accordion books because I think they look unfinished without it. You may not think it necessary, in which case you should trim off Tab C.
The second page of the pdf is laid out to give you two options: a wrap-around cover with a tucked closing, or a sleeve. If you choose the wrap-around cover you will need to score all four lines, then cut your strip lengthwise. This will leave you with a piece of paper with the cover image in the middle. Fold the paper back from the cover image along the score lines, measure the thickness of your book and score lines that distance away from your first folds. Fold the paper back again. Fit the left hand end around your book and mark a cutting line where it meets the edge of the fold from Tab C. Fold the right hand end around the book and mark a cutting line just short of the edge of the book. Cut both ends, then make diagonal cuts to shape the right hand end to a blunt point. The front of your cover should look like this:

The back of your cover should look like this:

Mark a dot on either side of the flap about a half inch (1.25 cm) in from the edge of the book. Pierce the dot with an awl and rotate the awl slightly to smooth the edges. Make two cuts close together between the pierced holes so that you have a narrow slit for the point of the cover. When the cover is tucked in it will look like this:

Glue the left end of the cover to Tab C.
When the book is displayed, the wrap-around cover can easily be tucked out of the way.

If you choose to make a slip case, cut off Tab C. Cut the second page of the pdf horizontally. Measure and fold as for the wrap-around cover but folding over the top and bottom edges of the accordion. The paper between the outer cover image and the bottom edge of the strip will provide for the fold over the thickness of the book plus a tab for gluing. You will need to trim the other end to fit after folding it over the top and back of the accordion. Before gluing your sleeve should look like this:

When gluing the tab and the top end together, use the book as a support and make sure that the sleeve is not too tight or you won’t be able to get your book out again!
Best wishes for successful book making and a happy, healthy holiday season!

It’s lovely 🙂 Thank you!!
LikeLike
You are welcome. ; ]
LikeLike
Thanks for this beautiful work!
LikeLike
Glad you like it. ; ]
LikeLike
very nice! thank you so much. I will post a link on facebook. you inspire me to come up with another free book.
LikeLike
Glad to be an inspiration. Please let me know what you come up with!
LikeLike
I purchased Snowy Owl and Datura a few years ago after I saw both in an exhibit in Milwaukee (I believe). I love them. Thank You so much for the PDF gift. Merry Christmas.
LikeLike
I am glad that my books have given you pleasure. Merry Christmas to you too!
LikeLike
Oh, my! Thank you so much! Lovely…
LikeLike
You are most welcome!
LikeLike
Thankyou so very much,how kind of you, Merry Christmas Rosemarie
LikeLike
You’re welcome. and Merry Christmas to you too!
LikeLike
Pingback: A Winter Postcard | Byopia Press