
It has been blustery here for a couple of weeks, but I discovered how to make the wind stop blowing: build a wind spinner and try to make a video of it in action.

If you want to make your own wind spinner, I recommend a minimum of three spinner units. Each spinner unit consists of three smaller modules. Three sheets of copier paper will make enough modules for four spinner units. For optimum paper use, divide your paper as shown in the drawing below.
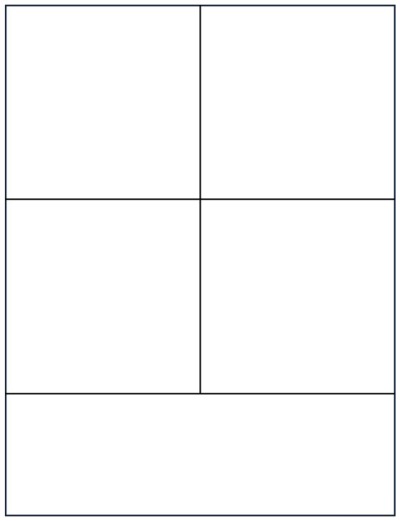
You don’t need to measure anything. Fold your paper as shown below and cut along the vertical edge of the triangle to make a large square.

To make four smaller squares, fold your large square in half vertically, then horizontally. Cut along the vertical and horizontal folds. (The diagonal fold —marked in dashes— is from making the large square and will save you a step later on. Do not cut it.)

The modules I use for my spinner units are a variation of a fold by @paperrain. She uses hers to create a Möbius strip. The first five steps are identical. You can follow those steps here or in the instructions beginning below.
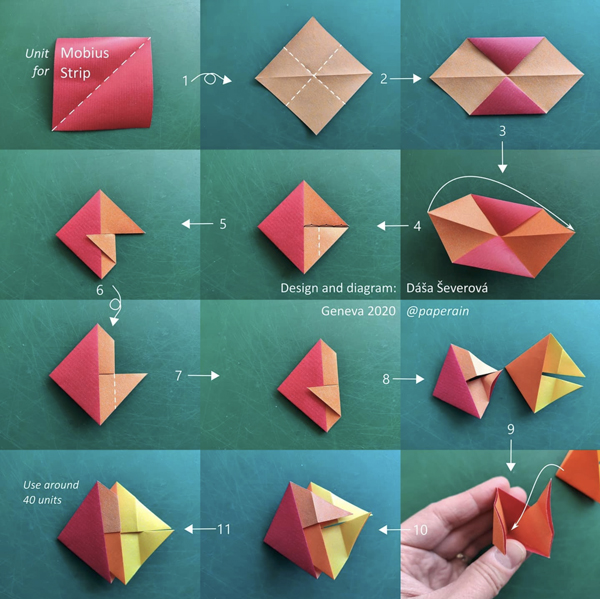
To make an individual module, lay your paper diamond-wise and fold in half. (Some of your small squares may already have this fold, allowing you to skip this step.)

Open your square flat, flip over, and rotate 45º. Fold in half horizontally.
Open flat, rotate 90º, then fold in half horizontally again.

Open flat, then rotate 45º. Fold the top and bottom points in to the middle to make two triangles. The tips should not quite meet. You need a bit of ease for the next fold.

Pull the points at the sides up to meet in the middle. You may need to push down in the centre to get this fold started. Squeeze flat.
You now have two points at the top and a triangle at the bottom. Fold the right-hand point down to the front. The fold should match the top edge of the bottom triangle. Flip your module horizontally and fold the second tip down. (The image below shows only the first tip folded).

To assemble your spinner unit, unfold the points from the previous step. Place two modules side by side with the points towards each other. Slide the upper point of the left module into the opening of the right module and the lower point of the right module into the opening of the left module.

Fold the right-hand module behind the left-hand module, then connect the third module the same way as before. You now have two remaining points to connect the first and third modules. You may have to slide the whole thing slightly apart and bend the points to achieve the final connection. The image below shows the first point inserted.
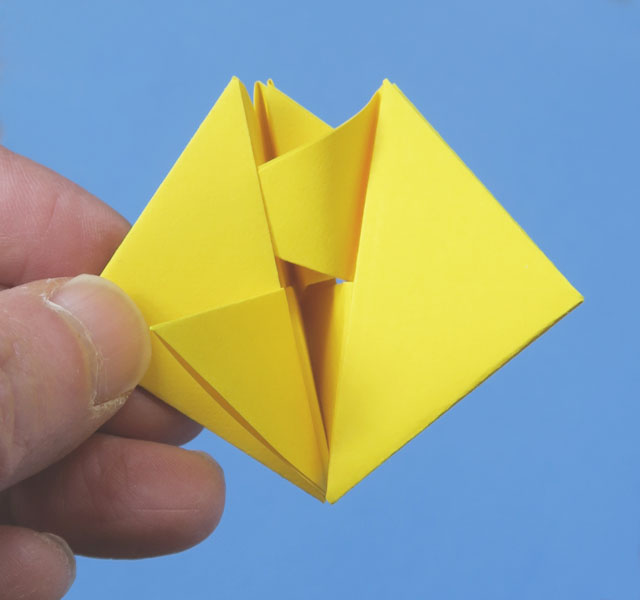
The next picture shows the second point inserted.
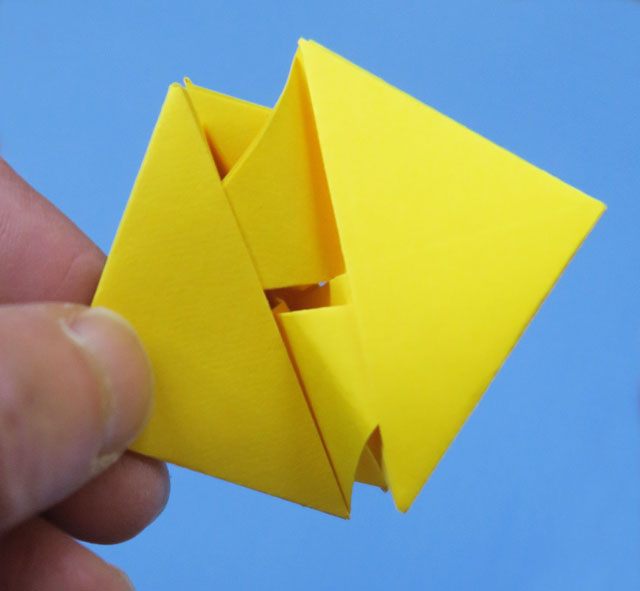
When both points are in place, push the whole thing together.

I found that spinner units tend to come apart in a strong wind if the modules are not glued in place. Pushing down on the outer points of two modules will open up a space. You can apply glue where indicated by the pointy fingers below and slide closed again. Repeat with all three joins.

If you are gluing your units before stringing them, make sure you are leaving a little space for the thread down the middle. You can insert a fine steel knitting needle or bamboo skewer before gluing to make sure there is enough room for your cord. Alternatively you can assemble your units around whatever cord you are using.
There are a couple of alternatives for mounting your units. If your wind spinner will be free-hanging, you will need to weight the bottom. I used wooden beads. You can use a heavy washer or equivalent alternative if you have no beads. Your other alternative is to mount your spinner both top and bottom using swivel snaps. This is the best solution for longer spinners or ones with a cord that tends to bind inside the units, making the spinner rotate as a whole.
You will also need some card stock or cardboard discs to make a smooth surface so each unit will rotate independently.

After you have added your weight to the bottom, add a card stock disc, then string (or assemble) your first unit. Tie a double overhand knot just above the unit and add another card stock disc.

Add a bead, then another disc, another unit, and so on until your spinner is complete.
Here’s the —not very moving— video I posted on Instagram.
In other book arts news:
![]()

I like fancy pencil boxes. I once bought a set of pencils just because I liked the box. If I find these ones in a shop, I might have to do that again.
*****


Many of my artist’s books are about memory. If you are interested in exploring the topic through writing, you might enjoy this workshop.
In other news:
Thursday was apparently the day for many of our colourful summer birds to return. I saw two Northern Orioles (male), three Goldfinches (two male and one female) and two Rose-breasted Grosbeaks. Here is a picture of a Grosbeak, looking very spiffy.


How to defy/tame the elements…aim for the opposite!
LikeLike
A sort of environmental reverse psychology.
; ]
LikeLiked by 1 person
Wind chime is interesting but your very best set of instructions was the Chinese thread book. Thank u very much for your sharing wisdom.
LikeLiked by 1 person
You are very welcome.
; ]
LikeLike
Pingback: Paper Wind Spinners and Turbines | Byopia Press