Due to the unexpected popularity of last Sunday’s post, Recomp, my blog received its 10,000th view sometime late Friday. In celebration of that event I am giving away another little artist’s book.
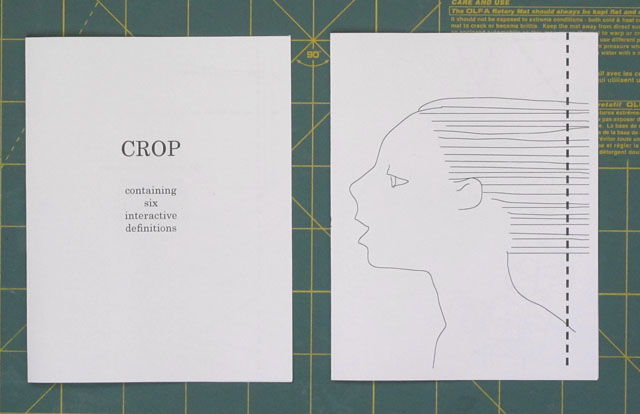
The original CROP was created in 2011 for that year’s weloveyourbooks exhibition.


It was the first time I had entered a work, and I was pleased to have a piece included. I only made one copy of the book, so if you would like to have one, you will have to make it yourself. As I cannot supply cheap children’s scissors to everyone, I have modified the design of the work (and the text) for this edition. If you have never sewn a book before, this little pamphlet is an easy introduction. I will take you through the process step-by-step.
Start by downloading the files that are appropriate for your printer and available paper and card stock: A4 paper, A4 cover, 8.5 x 11″ paper, 8.5 x 11″ cover. If your printer does not have a duplexer, be sure to feed the paper through in the correct direction when printing the second side.
You need to cut your sheet in half to make the book pages. I used the ends of the heavy dotted lines as a guide.

You now have two pieces of paper which you should fold in half to look like this:
Insert the right hand piece into the left hand so that the title page remains on the front. You now have a signature. Flush the pages together so that the folds are snug and the tops of the pages match. Trim the width of the unprinted areas off the foot of the pages and the fore-edge (non-fold edge).

I trimmed about .75 cm (.3″) off the foot and about .5 cm (.2″) off the fore-edge after printing on 8.5 x 11″ paper. This should be about right for the A4 version as well. Preparing the cover comes next.

Score the center line for the spine fold, then cut across the upper guides marked ‘B’ to make the top of the cover. I used my trimmed signature to establish the cut line for the foot. (The mark printed for the foot is an approximation.) Fold the cover in half, insert the signature into the cover, and pierce three sewing holes. The top and and bottom holes should be about 1.25 cm (.5″) in from the edge and the third hole should be in the middle.

If you don’t have an awl, you can use something else (like a T-pin) to make the holes. Never make holes into a self-healing cutting mat! The picture shows the book ready for hole piercing with a scrap of mat board under it. Make sure the pages and cover are all lined up properly before you make the holes. Don’t worry that the cover projects beyond the fore-edge of the pamphlet: we will deal with that later.
Finally, the sewing! Cut a length of heavy thread 3 times the height of the book. (I used mercerized crochet cotton, but any number of things from embroidery cotton to proper waxed linen bookbinder’s thread can be used for a little pamphlet like this.) This gives you enough thread to do the actual sewing plus ends long enough to allow you to tie a knot comfortably. Start the sewing on the inside of the book.

Pull the thread to the outside making sure that a tail is left inside the book. You will need this to tie the knot at the end of sewing.

Stitch from the outside to the inside through the upper hole.

Go to the bottom hole and sew back to the outside.

Finally, go from the outside back in through the middle hole. Try not to stitch through the thread that is already in the hole. (A blunt tapestry needle makes this easier.) When you come out the inside of the hole make sure that the two ends of the thread are on opposite sides of the long stitch down the centre of the spine.

Gently tighten the thread so that everything is held together firmly, but without bending the pages. Tie a Reef or Surgeon’s Knot (Reef knot is right over left, left over right; Surgeon’s Knot is the same but with two wraps in the first step) and then trim the ends leaving a bit of tail.

There are two options for finishing the cover. You can score and fold the cover a tiny bit wider than the pages so that you have turn-ins. This is a good option if you are using fairly lightweight card stock for the cover as it adds a bit of strength. Or you can trim the cover either to match the pages or to extend slightly beyond them.

Voila, a finished pamphlet. You may want to press your book under a weight for a day or two to flatten it.

sweet!
LikeLike
Not sure whether you are responding to my 10,000 views or the book, but in either case (or both?!), thanks. ;]
LikeLike
Oh, I remember it from when I first saw it in the we love your books gallery, and loved the idea. Thanks for sharing it! I tried to make it quickly minutes ago, with a stapler and a pair of scissors just to try it out and it somehow didn’t work for me. I am sure that is just my general stupidity, and I will try again taking more care. Just a small remark: you shift key seem to have been briefly struck, and you write your name MIller. – looks a bit funny 🙂 But then, maybe that was intended?
LikeLike
Not sure how it didn’t work out?! I made it step by step for the photos, so it should be OK. WIll have to go back and fix the typo!
LikeLike
sizes do not fit. I am rather sure I printed all the ones marked as A4, and I used the duplex on the printer (maybe I shouldn’t have). In the end the cover was smaller than the inside.
LikeLike
I will print out the A4 version and test it! Sorry about that. I usually make both to check when I am providing printables, but I was in a rush because I had not expected to reach 10,000 views this week!
LikeLike
OK, I printed out, cut, folded and trimmed the A4 version, then cut the cover. It all seems to work. I can think of 2 possible explanations. The first is that somehow a setting got changed on your printer between printing the text page and printing the cover, causing the cover to print at a different resolution. The second is that you skipped trimming the fore-edge and foot of the pamphlet and/or didn’t follow the suggestion of using the signature as a guide to cutting the lower edge of the cover. In either case your best bet would seem to be to try again! I have also corrected (with a little bit of eye-rolling) the typo in my name, and will be putting new links in as soon as I post this. ;]
LikeLike
Pingback: Gifts from Cathryn Miller | Midnight Musings
Love this post from before I “knew you.” I love your projects and your teaching style! Jane
LikeLike
Thanks! So glad you enjoy the projects.
; ]
LikeLike