Last week I wrote about accidentally inventing the Shrigley Binding while trying out various origami folds. This week I will show a simpler way to achieve the structure, and some variations of shape and assembly.

Since I had been playing with paper folding, I thought it would be nice to connect Shrigley pages with a paper hinge. I cut a strip of paper just a little shorter than the height of the page and a little more than four times the width of the turned in edges. I folded it in quarters lengthwise and turned in the corners at a 45° angle. You will notice that the angled folds leave a little room at the centre fold to allow for paper thickness.
The green unit can be used to attach pages for linear structures like accordions or boustrophedons. It can also be used to connect pages into larger groups of 2 or more which then function as a single page.

The outer section of the connector is tucked under the folded edge of the page with the angled edges sliding under the corner folds of the page.

The joining unit is almost completely hidden when the content pages are added.

Depending on the stiffness and surface texture of the papers, this might hold securely enough as is, but you can always add a little glue to be extra secure, especially if you expect the finished book to withstand a fair amount of handling.
In Elbel’s original Shrigley the pages are sewn to an accordion spine which self-adjusts for the thickness of the pages. You can, however, sew the pages directly to each other using a double buttonhole stitch rather than a pamphlet stitch. This provides some ease to allow for the thickness of the completed pages.

The thickness of the thread determines the amount of space between the pages. I have used this sewing for other books:

In both of those books (you can click on the titles for more info) the stitching remains visible, but once the content pages are added to the sewn-together Shrigley units, the stitching is almost completely hidden.
I also worked out a simpler method of folding the pages, which is likely closer to the method used by Benjamin Elbel.
Score the borders as shown in last week’s instructions, turn the paper over and fold the corners towards the centre, matching the score lines that define the square on the upper flap to the score lines on the main part of the paper below.

(Yes, that is a pentagon.)
If you are going to trim the points and cut corner slits, you can do it now.
Turn the paper over again.

Fold the edges toward the centre, forming the corner pockets as you do so. Press all the creases firmly.

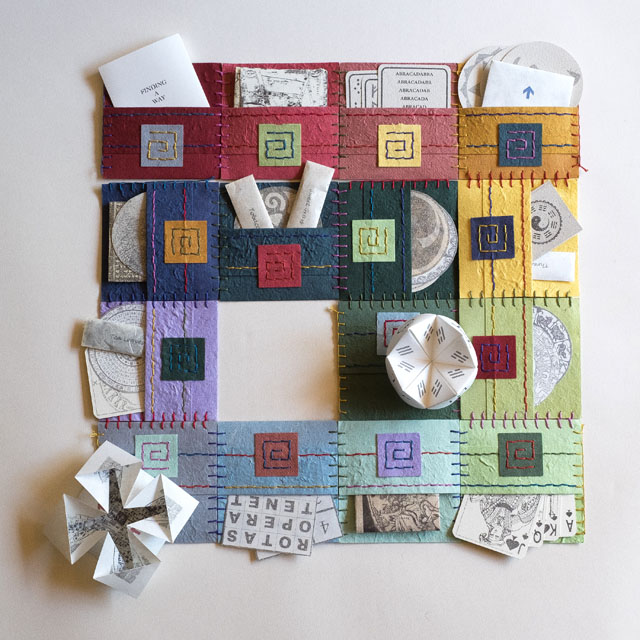
You can also make hexagonal pages.

Pentagons and hexagons can either be sewn together or joined with a folded paper unit. I cut the angled edge rather than folding it, since the folded corners would overlap at the middle and create unnecessary bulk. You just have to match the angled cut on the joining unit to the angled fold below the corner pocket.

You could make triangular pages too, though I didn’t actually try any. This means that a book could be made that folds up or opens flat, but also could be assembled to create a three dimensional structure like a dodecahedron. (The following images are from Wikimedia Commons.)


If you would like to try out some non-rectangular pages, you can download a pdf with two outlined pentagons here, and one with two hexagons here.
In other book arts news:

You might want to read Robert Bolick’s thoughtful piece On “The Book” (MIT Press, 2018). This is not merely a review of Amanda Borsuk’s new volume on artist’s books, but an interesting expansion on it. And no, I am not just mentioning this because my work is referred to in Bolick’s article. ; ]
In knitting news:

I completed, washed, blocked, and mailed off the gold silk scarf. Then I went back to working on the black cotton lace jacket. I had put it aside temporarily after ripping back to the beginning of the sleeves (knitting in one piece from the bottom up) because I had divided the back from the front in the wrong places.
I probably shouldn’t have started knitting the back of the collar onto the back of the neck so late at night. Fortunately I realised my mistake after completing the first half.

I’m not sure you can make out the topography, but it’s a Moebius join. The wide band of garter stitch which forms the front band of the sweater continues around the back of the neck to make a collar. The wide band of garter stitch should be in front of, not through the hole of shoulder seam.
Sigh!
I have now ripped that out and completed the collar join successfuly. Although the sleeve seams have yet to be sewn, I tried the jacket on. The weight of the cotton tends to drag the lace pattern lengthwise. I am hoping blocking (after sewing the sleeves) will correct this, but I have a strong suspicion that I will be ripping the whole thing out and knitting something else with the yarn.
I really hate learning experiences!

I just want to hang out with you and make these. Love everything you’ve shown here.
LikeLike
That would be fun!
LikeLike
I love all your post’s
Wauw
LikeLike
Thanks! ; ]
LikeLike
Love it! Wonderful accidents or serendipity is something I always rely on. Thank you for sharing.
LikeLike
You’re welcome!
; ]
LikeLike
Pingback: Bookmaking lately – gemtactics